skip to main |
skip to sidebar
 OK, it's been over three months! What have I been doing? Well, a lot, it turns out, which means that this (and the next few) post might be a little haphazard. I have pictures and I don't know whether I've posted them. I keep thinking I have projects that I've forgotten about. I have a couple of projects that aren't quite done but are so close I can almost taste it. And in my mind I've already moved ahead to my next project. So I'll do my best.
First, I made a couple of fun ornaments that I gave to various family and friends. The JOY ornament, to the right, was from a magazine from last year. I lost the magazine, so I don't remember which one it was, and I kind of had to figure out how to do it. But I thought it turned out quite well. I just bought dice-sized wooden blocks, painted half gold and half silver, then printed out the letters in a Gothic font. I don't recall if this was a font I already had, or one I downloaded from DaFont, which is a really fun site. Then I screwed in the smallest screw eyes I could find (DH pre-drilled holes for me) and connected with split rings. Oh, and a funny story: I went to Home Depot to find the screw eyes, and wasn't having much luck. So I asked an employee. He didn't know what screw eyes were! At first I thought maybe I was calling them the wrong name, but I have since learned that that is in fact what they are called. I suppose I shouldn't be surprised, since I was at Home Depot.
Next is the other ornament I made, which I just loved, but which I probably need a bit more practice on:
 It's from a holiday magazine from this year, and I still can't remember it! I put it into the giant stack of magazines. If I find it, I will edit this part and put it in. It's a cute little book, and you open it up and:
 It's a star! I used some Asian papers I had (images from a story about Japanese ships and text from what appears to be a Korean textbook) and so it's not that Christmas-y. but it was a lot of fun.
Another big project was the Marilyn Leavitt-Imblum Christmas angel from 1999, which you can find here. I also wanted to finish up what I had written about how I finish these. Here, I laid out the necessary supplies for finishing, here, I wrote about marking the centers, and here I showed how I centered the layers. That's where these projects stayed for... several months. It's not good to leave a straight pin in the project; it might cause a rust stain. But I had no ill effects in this case. Once centered, it's time to lace the stitching to the foam core and attach the fabric to the back. I say "attach" because I generally lace it, but this year I used double-sided tape instead. Because I use cardboard, it's not going to last forever (the front, however, is acid-free foam core and should last a long time), so I figured it was OK to use an adhesive. So here are the fronts, laced to the foam-core:
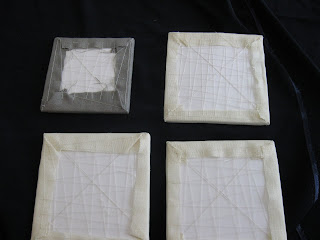 I use quilting thread. It's important that the thread be strong, but not stronger than the fabric. (Because it's easier to repair/replace thread than fabric.) Here are some laced backs:
 Clearly these are not the angels. Here are the angel backs:
 Clearly not laced; just taped.
Next, I attach the front to the back, using an invisible stitch. I did run into a couple of problems. First, on the checkerboard:
 These are DH's ornaments which you can see here (scroll down--its the door and window). And--ta-da!--the backs are too small! I don't even know how I did that. But it was an opportunity to change things because I was not liking the checkerboard fabric for this project. A future blog post will show the (correct size) new backing fabric, which is a dark green.
And one recalcitrant angel. First, after I laced it, I saw it was off-kilter. Lacing is not that much fun for me, so I was not inclined to undo and redo it. Next, the back was larger than the front. Well, I actually thought this was a good thing: I could just use double-sided tape to attach it, and it'd be a nice little frame of blue and then I could just attach the hanging ribbon to the outside and that would be really cool!. This was the result:
 I started thinking, which of the three people that I spend all this time and effort on could I send this poor angel? As I reflected further, I thought that if I had any aspirations to artistic creativity, I could not settle for poor technique and wonky results. So, sigh, I took it apart and did it right. So, attaching front to back, invisible stitch:
 Well, I don't know if you can really see that. If the hanging ribbon will be between the front and back, it needs to be attached at this time. Then I attach the ribbon using a whip stitch. The ribbon I chose for this year was a metallic silver, which I sewed on with a metallic thread. It was quite the pain. I used lots and lots of Thread Heaven. One good thing that came of the off-kilter angel was that I realized I could attach the ribbon to the outside, which I did.
Voila!

 OK, that's all for this post. But I promise, promise, promise to try to do better from here on out.
 The socks are finished! I am pretty pleased with them. The only person n the family they will fit is GameBoy, so he will get them. They are not blocked, as I don't have a sock blocker--yet--but I think they look pretty good anyway. Below is a sideways view:

I did play around a little bit with them. For instance, for a while, I tried to knit Continental style. It always looks so much faster and more efficient. But it's also very uncomfortable for me, so English style it will have to remain for now. Also, I was watching a knitting show on PBS while working on them, and it looked to me like their guest was knitting into the back of the first stitch on the needle. I have no idea why she did that, but I thought I'd see what it did. It let to short columns of twisted stitches. So I stopped that too.
Here is a close-up of my stockinette:
 And the ribbing:
 I like the way the color turned out. Not a lot of contrast, just mostly a greyish-blue with bits of lighter blue and green here and there.
I won't be able to move on the the next tote; it's time to start on Christmas. JCS Ornament Issue isn't out yet, but I'm putting together my kit to work on the 1999 Told In A Garden free Christmas Angel. That will be my next post.
A couple of years ago, I posted about how I am a magazine addict. Well, nothing has changed. Here is the current list of magazines piled in my front room:
Everyday Food
The Friend
Food Network Magazine
Parabola
Stringing
FiberArts
Quilting Arts
The Herb Quarterly
Threads
Edible Wasatch
Cloth Paper Scissors
Interweave Crochet
Paper Crafts
Vogue Patterns
Martha Stewart Living
Everyday with Rachael Ray
Beadwork
CardMaker
Interweave Knits
Clavier's Piano Explorer
Bon Appetit
Real Simple
Spirituality & Health
Piecework
Whole Living
Artful Blogging
Cuisine at Home
Tricycle
Vogue Knitting
BYU Magazine
Ensign
Just Cross Stitch (Halloween & Christmas issues only)
Quilting Arts Gifts
Somerset Studio
New Era
Green Craft
Apronology
Sew Somerset
Somerset Holidays & Celebrations
Now, to find a way to tastefully display them. Hmmm.....
 "Wild Socks" is the name of the pattern, and it came free with the purchase of the yarn. As you can see, left, I decided to go ahead and knit both at the same time, since I have two pairs of the size 5 needles. I don't really like to do a project twice, and was afraid I'd get bored if I finished one, and never finish the other.
Both sets of needles are Crystal Palace bamboo. Generally, wood or bamboo is what I prefer, as I dread dropping stitches. In this case, though, I was really getting frustrated with them. Perhaps it was my tension, but I'd have to really pull the stitches from one needle to the other, and then other stitches would also drop off, which was very frustrating. I have loosened my tension a bit and that has helped.
I also had a day where I did something wrong--I don't know what--and ended up with strange-looking stitches along the side, and also too many of them. I do know how to tink, but I still ended up just pulling them off the needles and ripping it out. There was much wailing and gnashing of teeth.
But I have now turned the heel on one sock:
 Sometimes the instructions made no sense, but once I did the actual knitting they became suddenly clear.Another angle:
 And here is where I am now:
 I believe I am ready to start the toes, but will actually go back and knit up to this point on the other sock now. I was advised to do the gauge, but I did not, not because I am foolish but because I knew I didn't have enough yarn to make big enough socks anyway. I really really wanted to learn to do this. Next time, though, I will do the measurements and buy enough yarn and do it right.
Meanwhile, I started a small crafty project: Washer pendants:
 I saw this on a local TV program a few months ago. You paste paper onto a washer, and then use pourable resin to finish it. So here are three pendants I have modge-podged, along with a plain washer so you can see that that's really just what it is, and a bottle-cap. For that, I am using the same techniques to make a fridge magnet. I saw these at a local arts/crafts festival and thought I could try to make my own. So far, I actually like the bottle-cap the best. Go figure.
 Well, I have finished the stitching on "What Can I Give Him?" Which leads to the question, "What now?" Now I have two totes of unFinished projects, and I haven't worked a bit on the first one since I last blogged it. Should I move on to a third, or should I do the finishing work like a good girl?
Back to WCIGH. Below is the front, which I previously blogged; nothing changed there:
 And the back:
 All I did there was to add initials and date (of last Christmas); I have too many projects to finish to try to figure out something fancy that would compete with the front anyway. And here is the band that will go around the side:

 The quote is from a poem by Christina Rossetti.
So I have decided to move on to a new tote and project, and really make an effort to alternate it with the Finishing work. The tote bag:
 I got this tote bag when I bought Franklin Habit's book "It Itches." I can be suckered into buying almost anything if a free tote bag is involved. You can never have too many tote bags. If you wanted to know what it says:
 The contents:
 From the right, clockwise: The instructions for my first pair of socks, a Lantern Moon needlecase, and self-striping yarn. I have been anticipating and dreading this project. I really want to learn to make socks, but the instructions look so complicated.
 The yarn is Regia 6 fadig Color, which is 75% wool/25% polyamide. It won't felt. The colors are green and blue, which are my colors lately: The colors of a dragonfly, the colors of air and water.
 My collection of double-pointed needles. The pattern calls for size 4. It turns out that I have two sets of size 5 and zero of size four. I have big feet; I will use the size 5 anyway, because it's more important that I get started than it is that I wear these.
 Here is my tatted heart for August. Can you see that it is a snowflake made of hearts? It's Hearts In A Snowflake by Jon Yusoff, whose blog is here. This was the first time I'd seen this blog and I think it's pretty amazing. For my heart, I used a perle cotton that was in my stash. I really like these variegated threads for tatting, especially if there are a lot of chains.
I really haven't done as much stitching as I would have liked. This is as far as I've gotten on "What Can I Give Him?":
 And a close-up:
 I am finished with this section of the heart; next I will stitch the long rectangle, which is all cross-stitch, over one. There actually is no pattern for the other heart section--it's the back--so I can decide whether to put something there, like initials and date, or leave it blank. Once this is finished, that will mean I have two tote bags of projects that need Finishing, as I have made absolutely no progress on the previous one, despite my good intentions.
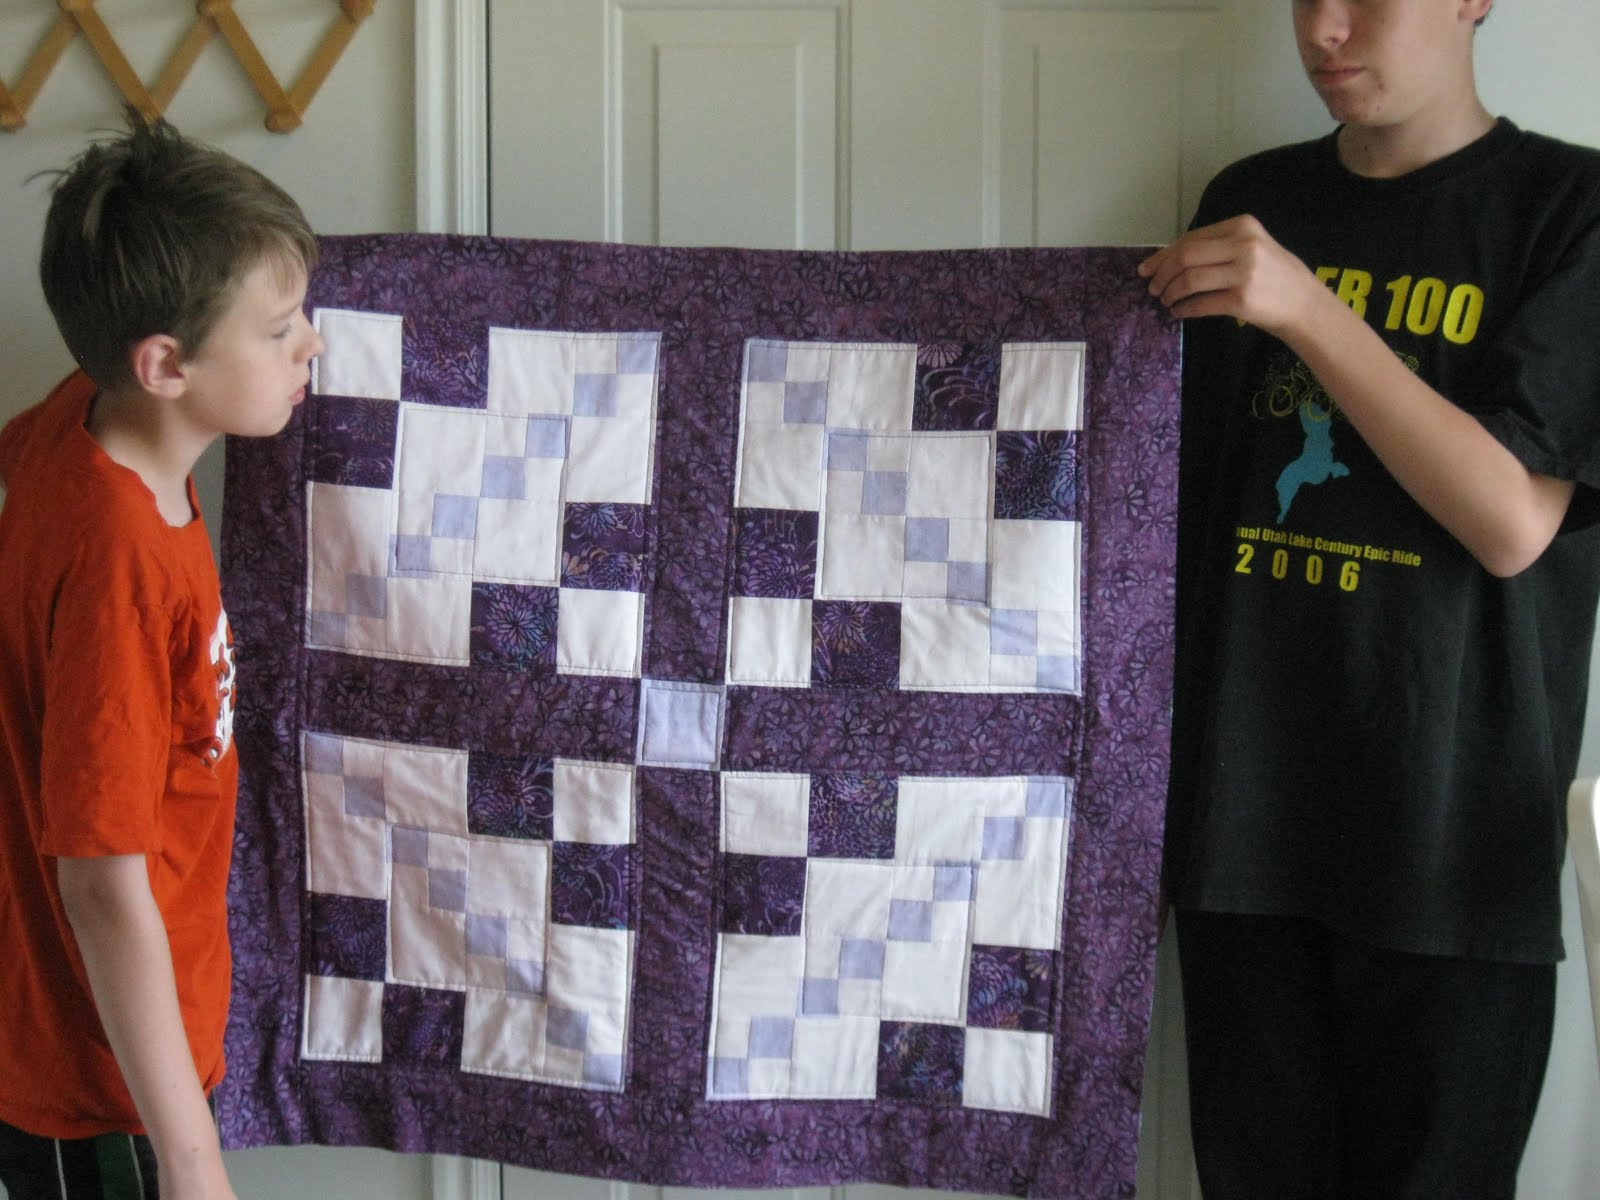
 My friend and I were able to get together and get started on the quilting portion of the quilt I started last fall. I'm so excited to be nearly done! The left pic shows where I am now on it: All quilted and ready for binding.
Because the feed dogs on my sewing machine don't drop, I did all straight quilting. First, I used the foot that comes standard on the sewing machine (I'm not a sewer--yet--and don't know all the terminology.) My friend Heather recommended a walking foot to reduce puckering, and, surprise, surprise, I have one:
 I did still have a bit of puckering, though, but it was just my inexperience showing and I plan to get better. Here is some of my quilting:
 You may be thinking, "Wow, that's some serious unstraight sewing!" and you'd be right. Something to work on, especially since I'd like to try my hand at sewing clothing. Also, in the bottom right corner of the above pic, you can see the thread is thick in one spot. That's where I started and stopped. Heather tells me that that is the easy way, but there is a way to start and stop so that it's not as noticeable, and I plan to learn that.
 Here's the back with all of it's obvious puckers. But that's OK. I like this fabric best of all I used, and I'll be using it for the binding so I can see it on the front.
I did have a moment of panic when I thought that I had done the final quilting in the wrong spot--around the seam of the border. I looked at the two quilts I have hanging in my studio, to see what they had done. They hadn't done such a seam! Panic! Instead of seeing that one was quilted "in the ditch" and the other had lots of curvy quilting all over the border, I immediately assumed that I had done it wrong. The binding on both is immaculately straight and naturally my mind leaped to the conclusion that they had done their seams on the edge of the quilt and lined up the bindings with that. And of course I had cut the edges off my fabric by then, which made it worse. But I got in touch with Heather, who assured me that I had in fact done it correctly. Whew!
 It hasn't been all quilting though. I started working on my ornament, "What Can I Give Him?" by Forget-Me-Nots-In-Stitches. Lauren Sauer is the designer. I have a couple of her pieces in progress and I really love her work. Anyway, I started by doing the outlines of each piece in backstitch:
 Well, that didn't work out too well! The heart in the upper left is not only in a bad place, it has a mistake, so the stitching wasn't lining up. Although the long rectangle is not so noticeable, it has the same problems. It was very important to follow the backstitch instructions exactly, so it will line up for finishing. There were some stitches over two, some over three, and a few over one. Working in-hand, because I was too lazy to tack it to stretcher bars, because I'd have to untack it and retack it later, made it very wrinkly. This is better:
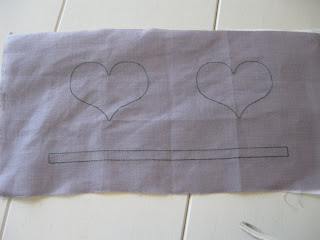 Still wrinkly, though. I didn't use steam to press it because I was attaching fusible interfacing:
 I don't even want to get into what happens when you cut things out in a hurry. Still, it'll work out, and now the project is attached to stretcher bars and ready for stitching:
 Lastly, it's now July and time for a new tatted heart. I'm hoping to get some thread tonight and get started on it. Stay tuned!


 Complete with evil laugh.


 OK, it's been over three months! What have I been doing? Well, a lot, it turns out, which means that this (and the next few) post might be a little haphazard. I have pictures and I don't know whether I've posted them. I keep thinking I have projects that I've forgotten about. I have a couple of projects that aren't quite done but are so close I can almost taste it. And in my mind I've already moved ahead to my next project. So I'll do my best.
 It's a star! I used some Asian papers I had (images from a story about Japanese ships and text from what appears to be a Korean textbook) and so it's not that Christmas-y. but it was a lot of fun.


 The socks are finished! I am pretty pleased with them. The only person n the family they will fit is GameBoy, so he will get them. They are not blocked, as I don't have a sock blocker--yet--but I think they look pretty good anyway. Below is a sideways view:


 "Wild Socks" is the name of the pattern, and it came free with the purchase of the yarn. As you can see, left, I decided to go ahead and knit both at the same time, since I have two pairs of the size 5 needles. I don't really like to do a project twice, and was afraid I'd get bored if I finished one, and never finish the other.
 Sometimes the instructions made no sense, but once I did the actual knitting they became suddenly clear.

 I saw this on a local TV program a few months ago. You paste paper onto a washer, and then use pourable resin to finish it. So here are three pendants I have modge-podged, along with a plain washer so you can see that that's really just what it is, and a bottle-cap. For that, I am using the same techniques to make a fridge magnet. I saw these at a local arts/crafts festival and thought I could try to make my own. So far, I actually like the bottle-cap the best. Go figure.
 Well, I have finished the stitching on "What Can I Give Him?" Which leads to the question, "What now?" Now I have two totes of unFinished projects, and I haven't worked a bit on the first one since I last blogged it. Should I move on to a third, or should I do the finishing work like a good girl?


 I got this tote bag when I bought Franklin Habit's book "It Itches." I can be suckered into buying almost anything if a free tote bag is involved. You can never have too many tote bags. If you wanted to know what it says:


 Here is my tatted heart for August. Can you see that it is a snowflake made of hearts? It's Hearts In A Snowflake by Jon Yusoff, whose blog is here. This was the first time I'd seen this blog and I think it's pretty amazing. For my heart, I used a perle cotton that was in my stash. I really like these variegated threads for tatting, especially if there are a lot of chains.
 And a close-up:
 July's Tatted Heart is called "Peacock Heart" and it's by Birgit's Tatting. Once again, I got the pattern from the internet and it is no longer there, so I can't post the link.


 My friend and I were able to get together and get started on the quilting portion of the quilt I started last fall. I'm so excited to be nearly done! The left pic shows where I am now on it: All quilted and ready for binding.


 Here's the back with all of it's obvious puckers. But that's OK. I like this fabric best of all I used, and I'll be using it for the binding so I can see it on the front.
 It hasn't been all quilting though. I started working on my ornament, "What Can I Give Him?" by Forget-Me-Nots-In-Stitches. Lauren Sauer is the designer. I have a couple of her pieces in progress and I really love her work. Anyway, I started by doing the outlines of each piece in backstitch:
 Still wrinkly, though. I didn't use steam to press it because I was attaching fusible interfacing:


