skip to main |
skip to sidebar
 OK, it's been over three months! What have I been doing? Well, a lot, it turns out, which means that this (and the next few) post might be a little haphazard. I have pictures and I don't know whether I've posted them. I keep thinking I have projects that I've forgotten about. I have a couple of projects that aren't quite done but are so close I can almost taste it. And in my mind I've already moved ahead to my next project. So I'll do my best.
First, I made a couple of fun ornaments that I gave to various family and friends. The JOY ornament, to the right, was from a magazine from last year. I lost the magazine, so I don't remember which one it was, and I kind of had to figure out how to do it. But I thought it turned out quite well. I just bought dice-sized wooden blocks, painted half gold and half silver, then printed out the letters in a Gothic font. I don't recall if this was a font I already had, or one I downloaded from DaFont, which is a really fun site. Then I screwed in the smallest screw eyes I could find (DH pre-drilled holes for me) and connected with split rings. Oh, and a funny story: I went to Home Depot to find the screw eyes, and wasn't having much luck. So I asked an employee. He didn't know what screw eyes were! At first I thought maybe I was calling them the wrong name, but I have since learned that that is in fact what they are called. I suppose I shouldn't be surprised, since I was at Home Depot.
Next is the other ornament I made, which I just loved, but which I probably need a bit more practice on:
 It's from a holiday magazine from this year, and I still can't remember it! I put it into the giant stack of magazines. If I find it, I will edit this part and put it in. It's a cute little book, and you open it up and:
 It's a star! I used some Asian papers I had (images from a story about Japanese ships and text from what appears to be a Korean textbook) and so it's not that Christmas-y. but it was a lot of fun.
Another big project was the Marilyn Leavitt-Imblum Christmas angel from 1999, which you can find here. I also wanted to finish up what I had written about how I finish these. Here, I laid out the necessary supplies for finishing, here, I wrote about marking the centers, and here I showed how I centered the layers. That's where these projects stayed for... several months. It's not good to leave a straight pin in the project; it might cause a rust stain. But I had no ill effects in this case. Once centered, it's time to lace the stitching to the foam core and attach the fabric to the back. I say "attach" because I generally lace it, but this year I used double-sided tape instead. Because I use cardboard, it's not going to last forever (the front, however, is acid-free foam core and should last a long time), so I figured it was OK to use an adhesive. So here are the fronts, laced to the foam-core:
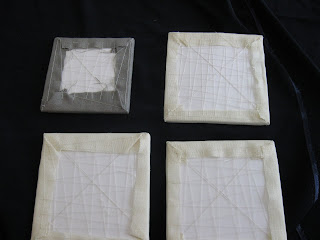 I use quilting thread. It's important that the thread be strong, but not stronger than the fabric. (Because it's easier to repair/replace thread than fabric.) Here are some laced backs:
 Clearly these are not the angels. Here are the angel backs:
 Clearly not laced; just taped.
Next, I attach the front to the back, using an invisible stitch. I did run into a couple of problems. First, on the checkerboard:
 These are DH's ornaments which you can see here (scroll down--its the door and window). And--ta-da!--the backs are too small! I don't even know how I did that. But it was an opportunity to change things because I was not liking the checkerboard fabric for this project. A future blog post will show the (correct size) new backing fabric, which is a dark green.
And one recalcitrant angel. First, after I laced it, I saw it was off-kilter. Lacing is not that much fun for me, so I was not inclined to undo and redo it. Next, the back was larger than the front. Well, I actually thought this was a good thing: I could just use double-sided tape to attach it, and it'd be a nice little frame of blue and then I could just attach the hanging ribbon to the outside and that would be really cool!. This was the result:
 I started thinking, which of the three people that I spend all this time and effort on could I send this poor angel? As I reflected further, I thought that if I had any aspirations to artistic creativity, I could not settle for poor technique and wonky results. So, sigh, I took it apart and did it right. So, attaching front to back, invisible stitch:
 Well, I don't know if you can really see that. If the hanging ribbon will be between the front and back, it needs to be attached at this time. Then I attach the ribbon using a whip stitch. The ribbon I chose for this year was a metallic silver, which I sewed on with a metallic thread. It was quite the pain. I used lots and lots of Thread Heaven. One good thing that came of the off-kilter angel was that I realized I could attach the ribbon to the outside, which I did.
Voila!

 OK, that's all for this post. But I promise, promise, promise to try to do better from here on out.


 Complete with evil laugh.


 OK, it's been over three months! What have I been doing? Well, a lot, it turns out, which means that this (and the next few) post might be a little haphazard. I have pictures and I don't know whether I've posted them. I keep thinking I have projects that I've forgotten about. I have a couple of projects that aren't quite done but are so close I can almost taste it. And in my mind I've already moved ahead to my next project. So I'll do my best.
 It's a star! I used some Asian papers I had (images from a story about Japanese ships and text from what appears to be a Korean textbook) and so it's not that Christmas-y. but it was a lot of fun.


