It's been a little while since I posted. I have another draft post--a really long draft--explaining why, at least in part. Let's just say the past few months have been a depressing, frustrating experience, textile-wise.
But I did get this small project done. I like cuffs and have wanted to make some for years. A few months ago, I bought a leather cuff from a man in my neighborhood who has started leatherwork. He had an Etsy shop, but I can't find it now. Argh. Well, if I do, I'll add a link to this post.
The leather cuff
It was immediately my favorite accessory; I wore it everywhere. And it solved a problem for me: how to measure my wrist to make sure any cuff I made fit properly. This one fit perfectly so I used it as a template.
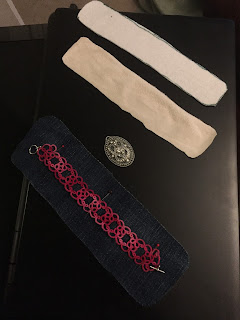
I wanted to make a denim cuff first. I have a tote full of old jeans, just waiting for me to do something with them. So I pulled that out, bought some Pellon (stiff but bendable) and some suedecloth, and sorted through my old jewelry box for a suitable medallion.
A few years ago, I visited Oak Island with my family, and I tatted bracelets for each of the women who were there. I liked my bracelet, but didn't feel it suited me well, or fit well, for that matter. But I thought it would look perfect with the denim.
Denim, suedecloth, pellon, tatted bracelet, sparkly pendant
After taking the photo, I thought, "Well, that doesn't look right!" The denim was uneven and, it turns out, suedecloth is a knit, something I have no experience with. I redid them, this time measuring out rectangles, cutting them with my rotary cutter instead of scissors, and then curving the corners.
Much better!
The tatted bracelet is stitched on with hot pink thread.
Pellon fused to the back
Suedecloth stitched to the back. Those are some tiny stitches! It's because I forgot to adjust my stitch length after working on darts.
From the front.
The medallion is added. I didn't have any good way to stitch it on, so I glued it on with E-6000 and tacked the very top on with a few stitches. That way, if the glue fails, it won't completely detach. My plan is that the stitches will be disguised by the eventual fraying.
Snaps attached and fraying started! The fraying may take a little while. I want it to fray down to the stitch line of the suedecloth. I did have to learn how to install the snaps for this part.
It's all over but the fraying!
It's not perfect, but overall I am very happy with this first step into making fabric cuffs. I have some beautiful orange silk shantung that I plan to use for my next project. I hope to start (and finish!) later this summer.


No comments:
Post a Comment